
Add a project
In tapster setup, open Projects.
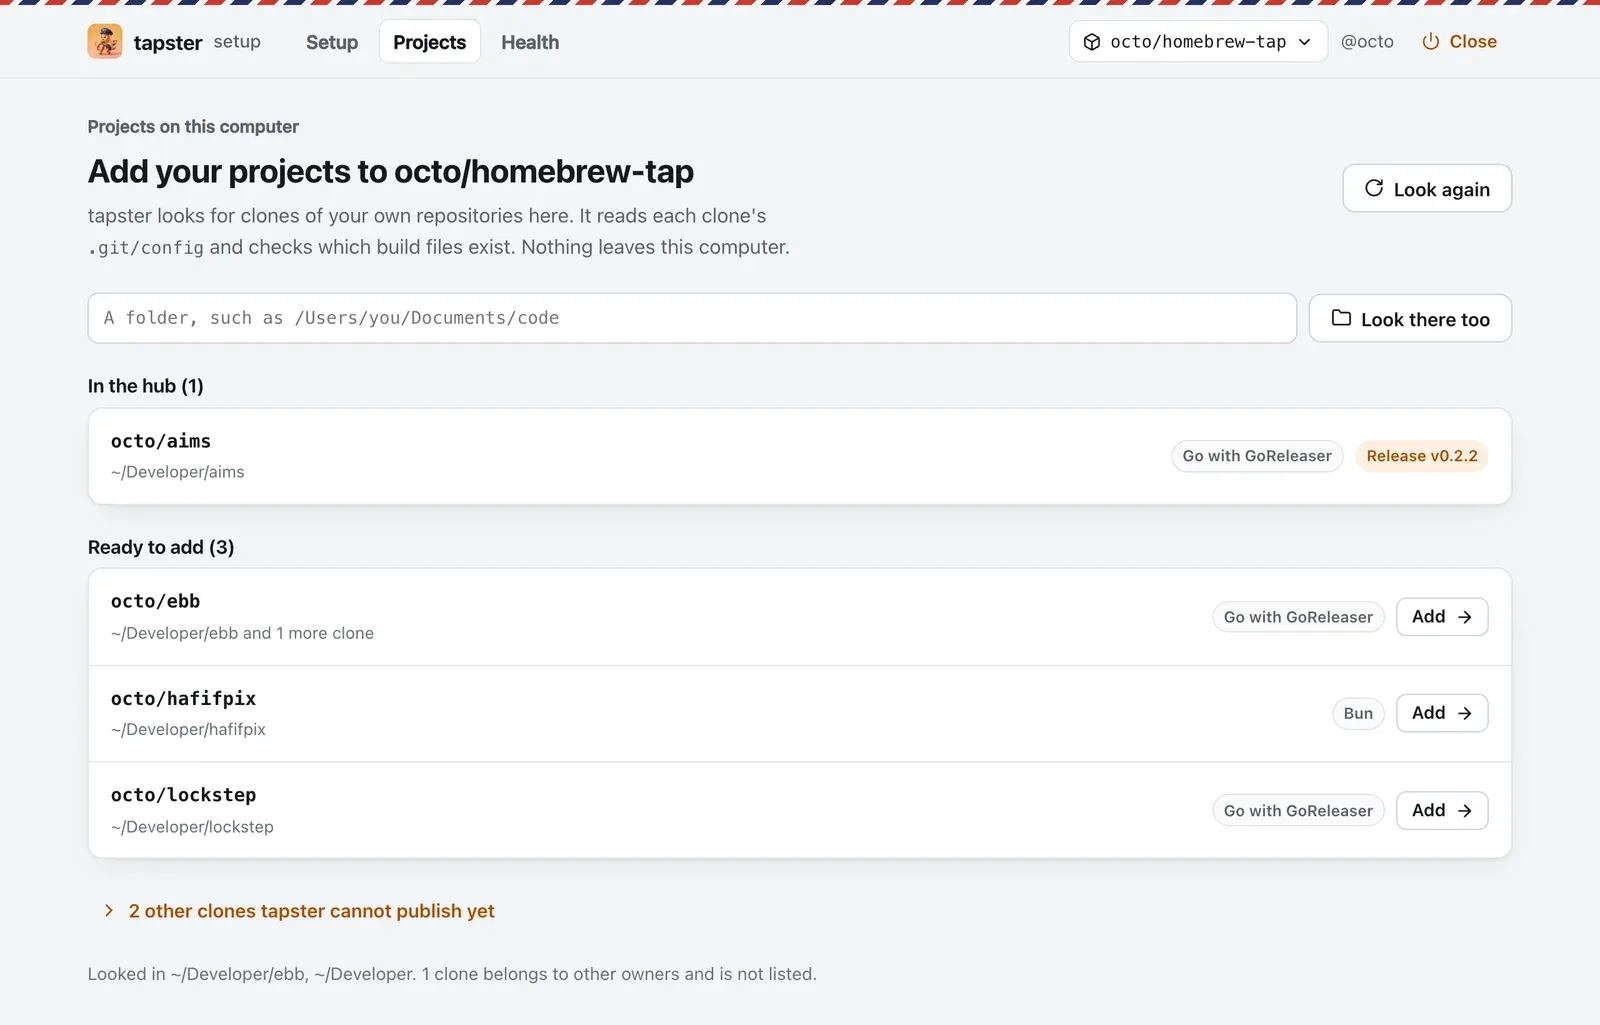
In the hub lists every project in the hub’s tapster.yml or waiting in a hub pull request, with its next step.
Ready to add lists the clones of your own repositories that tapster can publish.
tapster looks for clones in the folder you started it from, its parent and the usual places such as ~/Developer,
~/Projects and ~/code. It reads each clone’s .git/config and checks which build files exist. Nothing leaves your
computer. If a project lives elsewhere, type its folder and click Look there too. If several clones point at the
same repository, the list shows one: the clone on the default branch or else the one you changed last. Its sheet names
the others, so you can pick another.
It recognizes three kinds of projects:
- Go with GoReleaser: a
.goreleaser.yamlnext togo.mod. See Move a GoReleaser project. - Bun: a
package.jsonwithbinand abun.lock. See Bun projects. - A Mac app with Sparkle: see Mac apps with Sparkle, which has its own order of steps.
1. Choose the options
Section titled “1. Choose the options”Click Add next to the project.
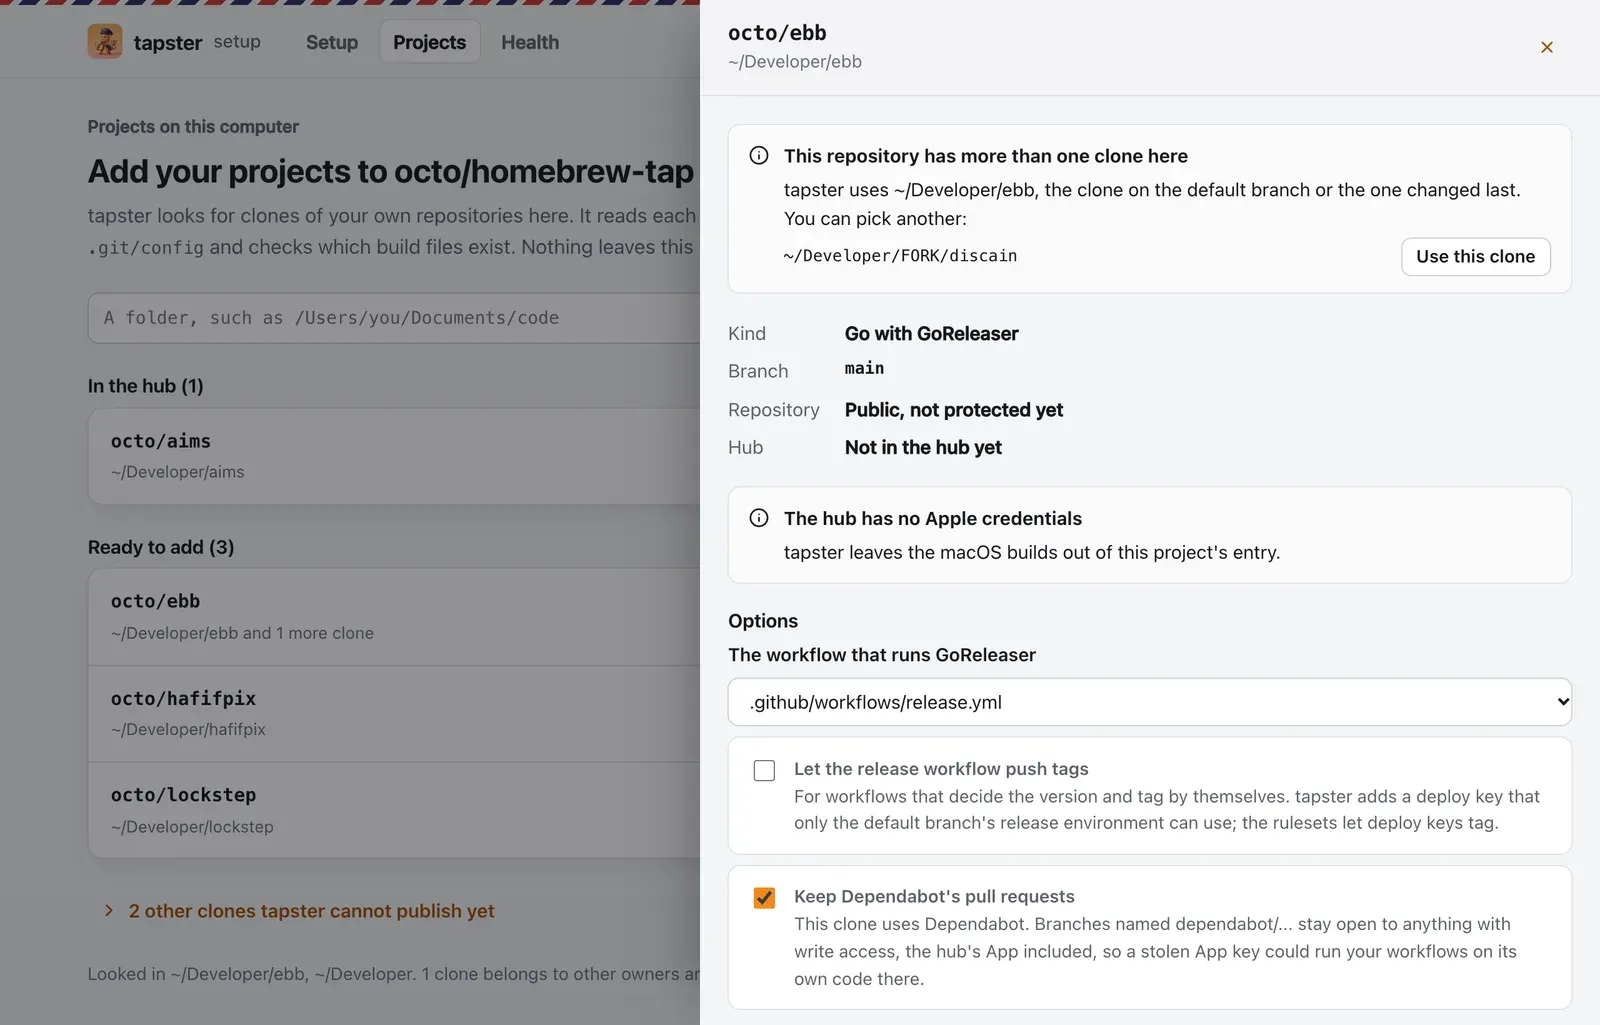
The sheet shows what tapster found and what it will do. The options:
- The workflow that runs GoReleaser, when a Go project has more than one.
- Let the release workflow push tags, for workflows that tag by themselves. See Releases tagged by a workflow.
- Keep Dependabot’s pull requests, preselected when the project uses Dependabot. See Dependabot.
- Replace the existing release workflow, when a Bun project or app already has one tapster does not recognize.
Click Add to you/homebrew-tap. tapster then:
- edits the release workflow so it opens a draft, attests the archives and rings the hub;
- protects the project: only you can create, move or delete its branches and tags. A stolen App key cannot tag code for your hub to sign. Your own pushes show “Bypassed rule violations”, which is your admin right at work;
- opens a pull request on the hub with the project’s entry for
tapster.yml.
Next to the button, Add, commit, push and merge in one go does the next section’s first two steps too. It is off by default and your browser remembers the choice. With it on, the button adds the project, commits only tapster’s files, pushes them and merges the hub entry. The sheet shows each step as it runs. If one fails, tapster stops there, shows why and leaves the rest to the steps below. Check the changes first shows the diff before anything happens. tapster refuses to do it in one go when the clone is not on the default branch, has changes of its own in the files tapster edits or has commits that are not on GitHub yet. It also refuses when the clone has no copy of the default branch from GitHub, because then it cannot tell what a push would send. It stops after adding when the hub’s pull request could not be opened.
2. Commit, merge and install
Section titled “2. Commit, merge and install”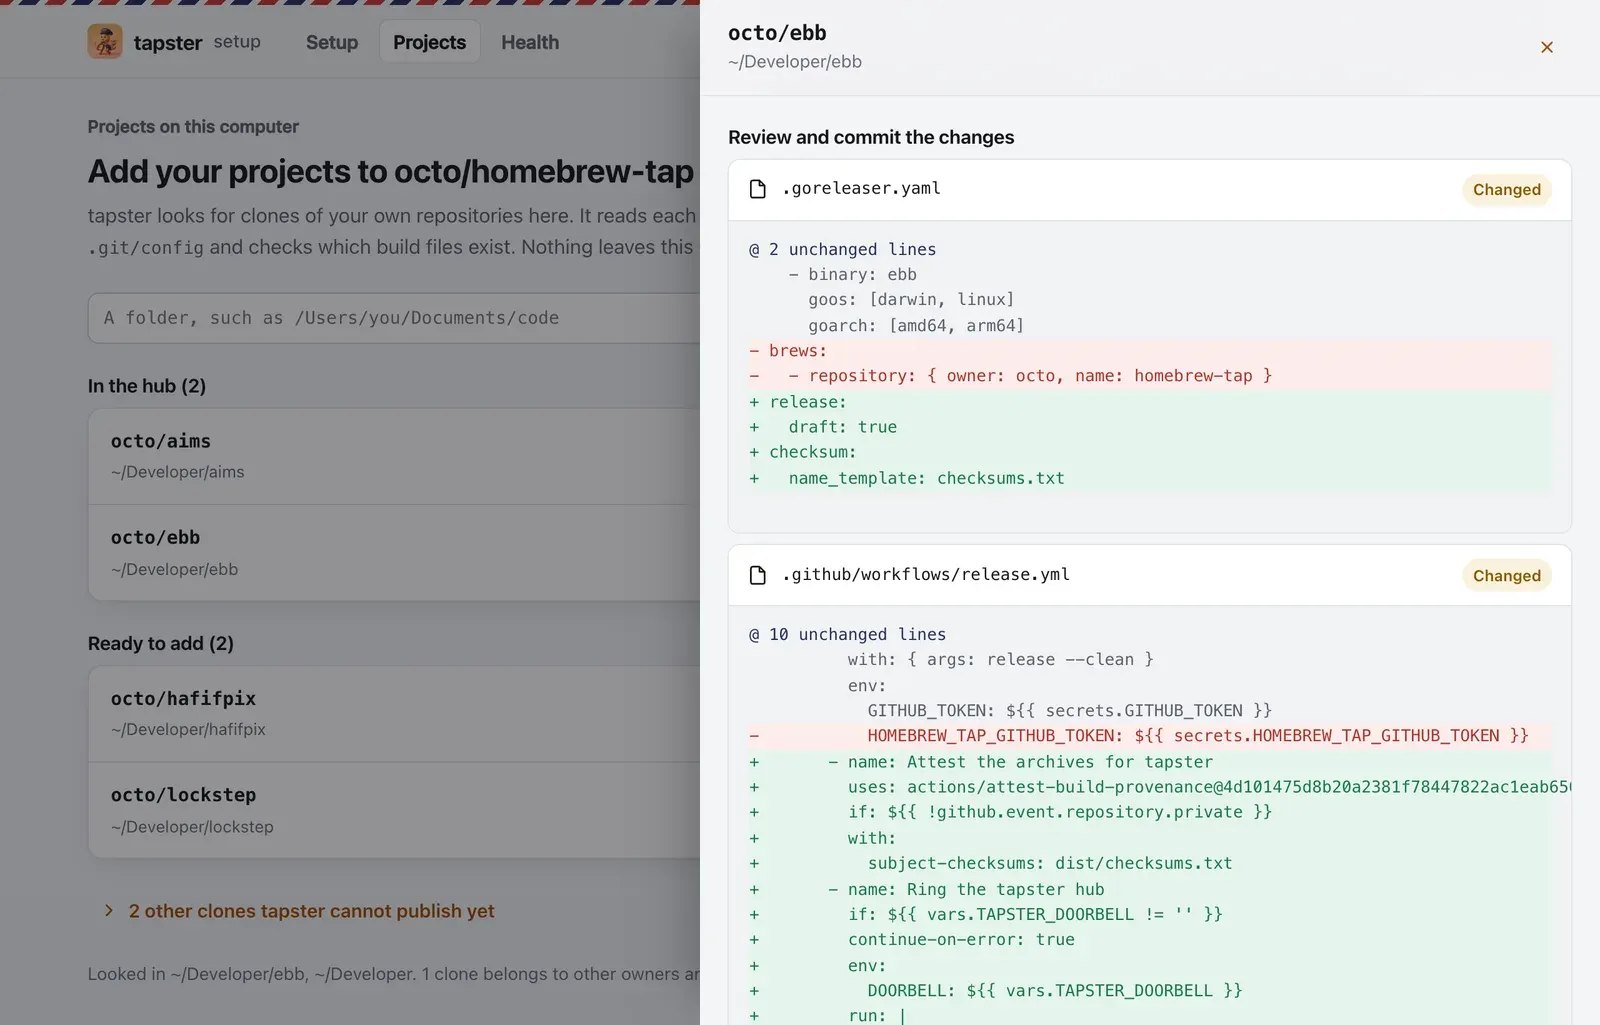
- Review the diff, then click Commit these files and Push. tapster commits only the files it changed, with your own git setup, so your hooks and commit signing apply. If git needs a password, the page gives you the command to run in a terminal. If the clone already has these files as committed, the sheet says No changes instead. When a push would also send commits that are not tapster’s, the sheet lists them next to Push.
- Under Hub entry, check the entry the sheet shows and click Merge the hub entry. tapster merges the pull
request with your GitHub sign-in. First it checks that the pull request still changes only
tapster.yml, that it adds just this entry to the one on main and that it still ends at the commit the sheet showed. It also waits while main holds a change you did not make, as the hub does. It then moves main only if main is still the commit it checked. If anything landed on main in between, nothing is merged and the sheet names those commits. Then it closes the pull request and deletes the branch. Review on GitHub opens the pull request there instead. - Under The hub’s App, click Install the App unless the App already reaches this project. GitHub preselects it; keep Only select repositories. With All repositories the App would also reach the hub, which holds your keys. The hub then refuses to run. This step stays on GitHub because GitHub does not let your sign-in add repositories to an App. GitHub shows an App’s repositories only to the App itself, so when you come back to the page tapster starts a hub run that checks it. The step turns done by itself when that run has reached the project.
If the repository’s GitHub description is one that Homebrew would reject, the sheet says so and the entry suggests a better one. Homebrew wants a short description that starts with a capital letter and has no full stop at the end.
3. Come back at any time
Section titled “3. Come back at any time”Click a project under In the hub (or under Your projects in Setup) to see where it stands. Each fact comes from GitHub and shows as done or as the next step:
- Release workflow: the files on the default branch open drafts, attest the archives and leave signing to the hub. If your clone has these changes but GitHub does not yet, the sheet offers to commit and push them.
- Protection: tapster’s rulesets protect the repository.
- Hub entry: merged or waiting in a pull request, with the entry and Merge the hub entry.
- The hub’s App: what the hub’s last check said about it, with the time of that check. Check again starts a hub run that checks it; tapster starts one run at a time.
- Releases: the latest release and whether the hub published it, a waiting draft with the hub’s reason if it refuses it and the next release. See Ship the first release.
Update the project appears only when something is missing that adding fixes. Adding again keeps the entry the hub already has. If GoReleaser’s Homebrew section is gone because an earlier run removed it, tapster reads the description, homepage, license and completions from the clone’s git history.